Friday, February 10, 2012

Make your own CD/DVD Sleeves

So as a photographer who sells digital files in addition to prints I have been thinking of how to present the CDs I am giving out to my clients in a professional way. The truth is, cheap white CD sleeves from local stores look... well... cheap. As photographers who put a lot of time and effort into our images we don't want to devalue our product by skimping on packaging. Presentation counts. BUT when I researched possible companies I could purchase custom CD/DVD sleeves from and checked out their products online I realized that at this point I simply cannot spend $5+ on one single sleeve. Don't get me wrong, I understand that it costs that much to purchase the materials and equipment, and cover the time it takes to create each sleeve and prepare it for shipment. $5 is a fair price and I could just increase my photography prices and include $5 per sleeve in the budget. Or I can make them myself and eliminate all but the material cost. If you want to know how and my long paragraph hasn't scared you away yet, I am about to share my "secret". I'll even throw in a printable template.


All you need to create your custom CD sleeve is a piece of paper (8.5x11 inches), scissors, a glue stick, little velcro dots from the craft store (optional) and either a printer or a ruler and a pencil.


In the image above I used the red lines to show you the outline of the paper. Nice scrapbooking paper (either solid colored or with a design) in that size is available at any craft store for $0.30+. You can even find paper with linen texture there! Just make sure the paper isn't too thick, otherwise it becomes difficult to fold it neatly. For my own sleeve I went to Staples (sorry about the name-dropping, I swear I don't work for them) and picked 32lb silverized pearl-coated paper. Looks very elegant and expensive. Costs $1.28, including printing.

Printed Logo
If you want to print your logo on the sleeve you are a bit restricted as to the color of the paper you can use. When picking your paper it is best to choose a light color or a color similar to the one in your logo. Why? Because otherwise your logo will have an ugly tint to it. Another option would be to open your template named CDSleeveFront, color the background, and then place your logo on top of it. Now print the template on white paper and there will be no tint. You definitely need a laser printer for good results, though.

I asked Staples to print my template named CDSleeveBack on one side of the paper. It is important to request that they DO NOT shrink to fit. Doing so will mess up the proportions of my template. If you are printing at home, make sure you check the settings. I realize that printers won't be able to print the lines all the way to the edge, but when cutting along the outline of the sleeve you will need to include the edges, because we need to use the entire length of the paper for the sleeve. 

I added my logo to the template named CDSleeveFront and had them print it on the other side of the paper. If you don't want your logo printed on your CD/DVD sleeve, you can skip this part.

No Printed Logo
If you don't want to print the logo, you can just print the template named CDSleeveBack on the back side of your paper. Again, check your printer to make sure you DO NOT shrink to fit. If you prefer to draw the outline of the sleeve by hand using a ruler and pencil rather than printing my template, you can get the dimensions from the image above. A sticker on the front can always replace the printed logo.


Your next step is to cut out the template (either printed or hand-drawn) along the outer lines.
The blue Xs in the image above show you the edges that would look a lot nicer if you'd slightly curve them. You can either do that with scissors or use this awesome little tool that you can get for $1 at any craft store. It evenly punches out the corners and leaves a nice, curved edge. 


Now fold the bottom part of the template over (in the image above I marked this as STEP 1), so that it covers up the printed line (and does not cover up the logo). Fold the sides over in the same way (Step 2 and Step 3) and use a glue stick to hold them in place. 


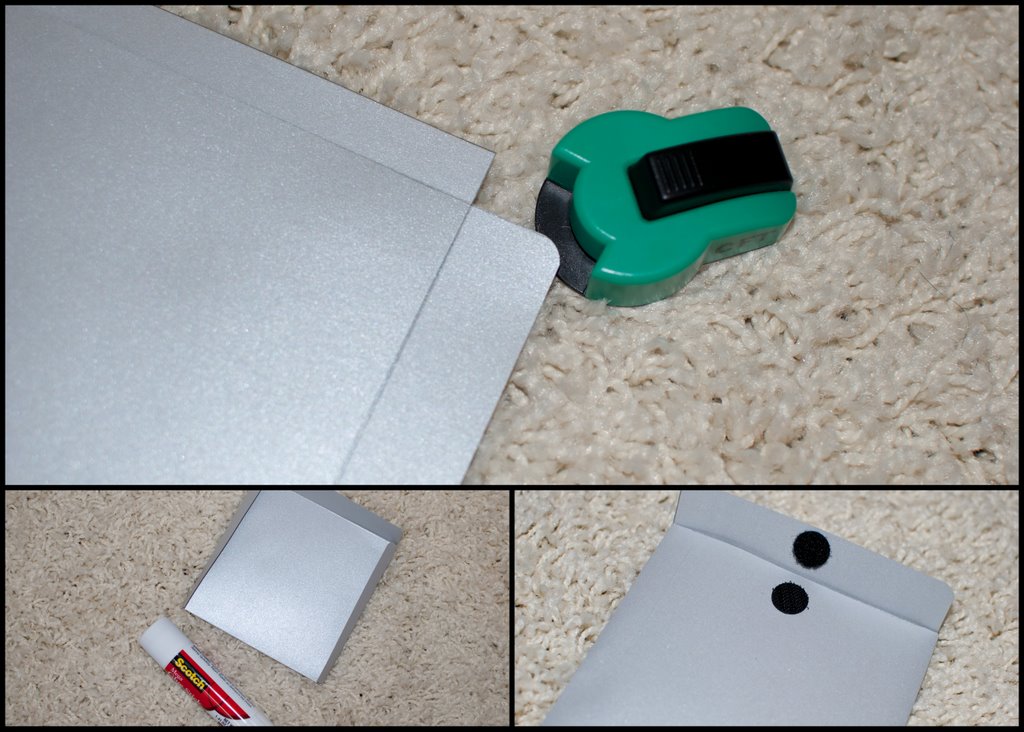
It already looks pretty awesome, doesn't it? Now you can fold over the top (Step 4) and use the little sticky velcro pieces to open and close your sleeve and you're done!

What do you think? Doesn't it look professional? And it cost between $0.30 and $2.00 to make, depending on your choices, and can be finished in no more than 15min.

Ready for the templates? Here they are: http://www.mediafire.com/?77sl6fkvrbk0o7h


Wednesday, February 1, 2012

Using Clipping Masks in Photoshop

If you have never heard of clipping masks before or have not gotten around to learning about them, you are going to LOVE this! I spent many months awkwardly cropping images and trying to place them exactly in the right spot in storyboards, which is both annoying and slow. Clipping masks make that unnecessary.

Let's open a new document in Photoshop. Mine is 800x800pixels and 72pixels/inch resolution, but it honestly doesn't matter for our purpose right now. Click on LAYER-NEW-LAYER and name it "Shape". Your layers palette now looks like this:


Why did I create a new layer for the shape we are about to draw? Because the background is white while the new layer is transparent. Placing a shape on a white background merges the shape and the background. They become one layer, which makes altering them separately much more difficult. By placing the shape on a transparent layer we have it completely separate and will be able to use clipping masks.

Now click on the Custom Shape Tool from your tool palette on the left. Then select a shape from the options on the top. Since it's almost Valentine's Day and I like to be cheesy sometimes I picked a heart, but anything will work.


Now open the image you would like to use for this. I picked one of my sister - again - because I know she won't mind. Drag and drop the image on top of your shape. Make sure the image covers the shape completely. If it's too small. pick a different image or go through all the steps all over again with a bigger document. If it's too big, go to EDIT-TRANSFORM-SCALE and with the chain symbol on the top selected, make your image smaller until it just about covers the shape. 

Now we get to the fun part. Go to LAYER-CREATE CLIPPING MASK with the image selected. It is important that the layer of the image is immediately on top of the shape in your layers palette. Here is what happens:


How cool is that??? Now as you can see in your layers palette, the image is completely intact; we did not crop it. In fact, you can move it around until it's in the perfect spot. You can even scale the image again while the clipping mask is applied.

Now if you have purchased one of my templates from my shop at http://phoenixdesigns.bigcartel.com/ (see how subtly I advertise?), knowing about clipping masks will help you use the storyboards.


See how the image is placed right on top of the rectangular shape I creatively named "2"? The clipping mask was already applied to the "Place image here" layer, so it snapped right into place. 

The best thing is, clipping masks are not limited to photography and shapes. In the following case I spelled the word LOVE, right clicked on the layer and the RASTERIZED THE TYPE. Then I added a plaid digital paper right on top of the LOVE layer, applied a clipping mask and here is what I got:


Cool, isn't it?