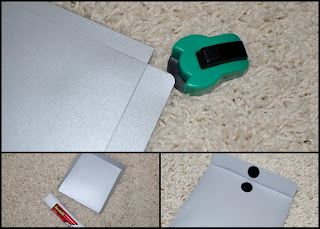
All you need to create your custom CD sleeve is a piece of paper (8.5x11 inches), scissors, a glue stick, little velcro dots from the craft store (optional) and either a printer or a ruler and a pencil.
In the image above I used the red lines to show you the outline of the paper. Nice scrapbooking paper (either solid colored or with a design) in that size is available at any craft store for $0.30+. You can even find paper with linen texture there! Just make sure the paper isn't too thick, otherwise it becomes difficult to fold it neatly. For my own sleeve I went to Staples (sorry about the name-dropping, I swear I don't work for them) and picked 32lb silverized pearl-coated paper. Looks very elegant and expensive. Costs $1.28, including printing.
Printed Logo
If you want to print your logo on the sleeve you are a bit restricted as to the color of the paper you can use. When picking your paper it is best to choose a light color or a color similar to the one in your logo. Why? Because otherwise your logo will have an ugly tint to it. Another option would be to open your template named CDSleeveFront, color the background, and then place your logo on top of it. Now print the template on white paper and there will be no tint. You definitely need a laser printer for good results, though.
I asked Staples to print my template named CDSleeveBack on one side of the paper. It is important to request that they DO NOT shrink to fit. Doing so will mess up the proportions of my template. If you are printing at home, make sure you check the settings. I realize that printers won't be able to print the lines all the way to the edge, but when cutting along the outline of the sleeve you will need to include the edges, because we need to use the entire length of the paper for the sleeve.
I added my logo to the template named CDSleeveFront and had them print it on the other side of the paper. If you don't want your logo printed on your CD/DVD sleeve, you can skip this part.
No Printed Logo
If you don't want to print the logo, you can just print the template named CDSleeveBack on the back side of your paper. Again, check your printer to make sure you DO NOT shrink to fit. If you prefer to draw the outline of the sleeve by hand using a ruler and pencil rather than printing my template, you can get the dimensions from the image above. A sticker on the front can always replace the printed logo.
Your next step is to cut out the template (either printed or hand-drawn) along the outer lines.
The blue Xs in the image above show you the edges that would look a lot nicer if you'd slightly curve them. You can either do that with scissors or use this awesome little tool that you can get for $1 at any craft store. It evenly punches out the corners and leaves a nice, curved edge.
Now fold the bottom part of the template over (in the image above I marked this as STEP 1), so that it covers up the printed line (and does not cover up the logo). Fold the sides over in the same way (Step 2 and Step 3) and use a glue stick to hold them in place.
It already looks pretty awesome, doesn't it? Now you can fold over the top (Step 4) and use the little sticky velcro pieces to open and close your sleeve and you're done!
What do you think? Doesn't it look professional? And it cost between $0.30 and $2.00 to make, depending on your choices, and can be finished in no more than 15min.
Ready for the templates? Here they are: http://www.mediafire.com/?77sl6fkvrbk0o7h


Love the tutorial! I'll be pinning this on Pinterest, and adding to my list of things to make! :) Thank-you for putting it together.
ReplyDeleteYou're welcome! Thanks for pinning! So glad you like it!
Delete